
co-cherry
외부 API + Redis 캐싱 구조 설계하기 본문
왜 외부 API를 사용하는가?
웹 서비스는 자체 DB만으로 모든 데이터를 제공하기 어렵다.
실제 서비스에서는 다양한 외부 데이터를 활용하기 위해 외부 API를 연동한다.
- 날씨 정보 조회
- 영화/도서 검색
- 환율 정보
- 뉴스 데이터
- 주소 검색
- 공공 데이터 조회 등
하지만 외부 API는 우리 서버가 직접 관리하는 시스템이 아니므로 여러 문제가 발생할 수 있다.
- 응답 속도 지연
- 네트워크 장애
- API 호출 제한
- 외부 서버 장애
- 응답 구조 변경 등
따라서, 외부 API를 단순히 호출만 하는 것이 아니라 성능과 안정성을 함께 고려해야 한다.
이 문제를 해결하기 위해 많이 사용하는 기술이 Redis 캐시이다.
Redis 란?
In-Memory 기반의 Key-Value 저장소
*비 관계형 구조로서 데이터를 그저 'Key-Value' 형태로 단순하게 저장하는 구조
일반적인 데이터베이스처럼 디스크에 데이터를 저장하는 것이 아니라,
메모리(RAM)에 데이터를 저장하기 때문에 읽기/쓰기 속도가 매우 빠르다.
Spring Boot 프로젝트에서는 Redis를 다음과 같은 용도로 주로 사용한다.
- 캐시(Cache)
- 세션 저장소
- 인증 토큰 관리
- 랭킹 시스템
- 실시간 데이터 처리
이번 프로젝트에서는 외부 API 응답 결과를 잠시 저장하는 캐시 용도로 Redis를 사용해볼 예정이다.
Redis를 캐시로 사용하는 이유
외부 API를 사용할 때, 같은 요청이 반복해서 들어오는 경우가 많다.
사용자가 요청을 보낸다 → 외부 API를 호출한다 → 응답을 반환한다
이 과정이 매번 반복되면 응답 속도가 느려지고 외부 API 서버 부하가 발생하며 API 호출 비용이 발생할 수 있다.
이때, Redis에 API 응답 결과를 저장해두면 같은 요청이 다시 들어왔을 때 외부 API를 다시 호출하지 않아도 된다.
하지만, 캐시 데이터를 무한정 저장하면 또 다른 문제가 발생한다.
예를 들어 날씨 데이터는 시간이 지나면 계속 바뀌게 된다.
만약 Redis에 저장된 날씨 데이터를 계속 유지한다면, 사용자는 오래된 날씨 정보를 받게 될 수 있다.
즉, 캐시 데이터는 일정 시간이 지나면 자동으로 삭제되거나 갱신될 필요가 있다.
이때 사용하는 개념이 TTL(Time To Live)이다.
TTL(Time To Live)
캐시 데이터가 살아 있는 시간
예를 들어 Seoul 날씨 데이터를 Redis에 10분 동안 저장한다고 가정해보자.
10분 안에 같은 요청이 들어오면 Redis에 저장된 데이터를 반환하고, 10분이 지나면 기존 캐시를 삭제한 뒤 외부 API를 다시 호출해 최신 데이터를 저장한다.
이를 통해 응답 속도를 유지하면서도 오래된 데이터가 계속 사용되는 문제를 방지할 수 있다.
Redis는 TTL 기능을 자체적으로 지원한다.
따라서, 어플리케이션에서 직접 만료 시간을 관리하지 않아도, 설정한 시간이 지나면 Redis가 자동으로 캐시 데이터를 삭제한다.
https://oliveyoung.tech/2025-07-23/redis-tips-for-developer/
개발자가 알면 좋은 Redis 꿀팁 모음 | 올리브영 테크블로그
실무에서 바로 쓰는 Redis 핵심 팁 공유
oliveyoung.tech
[REDIS] 📚 레디스 소개 & 사용처 (캐시 / 세션) - 한눈에 쏙 정리
Redis (Remote Dictionary Server) Redis는 Remote(원격)에 위치하고 프로세스로 존재하는 In-Memory 기반의 Dictionary(key-value) 구조 데이터 관리 Server 시스템이다. 여기서 key-value 구조 데이터란, mysql 같은 관계형
inpa.tistory.com
https://jinwookoh.tistory.com/112
Redis TTL (Time-To-Live) 이란?
**TTL (Time-To-Live)**은 Redis에서 특정 키의 유효 기간(만료 시간, Expiration Time)을 설정하는 기능입니다.TTL이 설정된 키는 지정된 시간이 지나면 자동으로 삭제됩니다.TTL은 캐시 만료, 세션 관리, 임시
jinwookoh.tistory.com
프로젝트에 적용해보기
이번 실습에서는 Open-Meteo API를 사용해 도시의 현재 날씨 정보를 조회하고 조회 결과를 Redis에 캐싱해볼 예정이다.
첫 번째 요청에서는 외부 API를 호출하고, 두 번째 요청부터는 Redis에 저장된 캐시 데이터를 반환한다.
또한, TTL을 설정하여 일정 시간이 지나면 캐시 데이터가 자동으로 만료되도록 구성한다.
1. Redis 의존성 추가하기
Redis를 Spring Boot에서 사용하기 위해 spring-boot-starter-data-redis 의존성을 추가한다.
이 의존성을 추가하면 RedisConnectionFactory, RedisTemplate, StringRedisTemplate 등을 사용할 수 있다.
implementation 'org.springframework.boot:spring-boot-starter-data-redis'
2. application.yml에 Redis 설정 추가하기
spring: 아래에 다음과 같은 설정을 추가한다.
  data:
    redis:
      host: localhost
      port: 6379
Redis 서버는 기본적으로 6379 포트를 사용한다.
이번 실습에서는 Docker로 로컬 Redis 컨테이너를 실행할 예정이므로, host는 localhost, port는 6379로 설정한다.
3. Docker로 Redis 실행하기
터미널에서 아래의 명령어를 입력한다.
docker run -d --name redis-study -p 6379:6379 redis- docker run 새 컨테이너 실행
- -d 백그라운드 실행
- --name redis-study 컨테이너 이름 지정
- -p 6379:6379 내 컴퓨터 6379 포트와 Redis 컨테이너 6379 포트 연결
- redis Redis 이미지 사용
성공적으로 명령어가 실행되면 Docker Desktop에 새로운 컨테이너가 생성된 것을 볼 수 있다.

4. 외부 API 호출용 RestClient 설정하기
Spring Boot 3.X 에서는 RestClient를 사용해 외부 API를 동기 방식으로 호출할 수 있다.
RestClient를 Bean으로 등록해두면 Service 계층에서 주입받아 재사용할 수 있다.
@Configuration
public class RestClientConfig {
    @Bean
    public RestClient restClient() {
        return RestClient.builder()
                .build();
    }

}
Q. RestClient가 뭘까?
Spring에서 제공하는 HTTP 클라이언트
Spring Boot 애플리케이션이 외부 API 서버에 요청을 보내고, 응답 데이터를 Java 객체로 변환해서 사용할 수 있게 도와준다.
사용자
  ↓
우리 Spring Boot 서버
  ↓ // RestClient 사용
Open-Meteo 외부 API 서버
  ↓
우리 Spring Boot 서버
  ↓
사용자에게 응답
5. 날씨 기능 패키지 구조 만들기

날씨 조회 기능은 기존 도메인과 직접적인 관련이 없기 때문에 패키지를 따로 생성했다.
Controller를 통해 요청/응답을, Service는 외부 API 호출과 캐싱 로직 설정을, DTO는 외부 API 응답과 클라이언트 응답 구조를 표현하기 위해 생성했다.
6. 클라이언트에게 반환할 날씨 응답 DTO 만들기
먼저 사용자에게 응답할 DTO의 형태를 설정한다.
@Getter
@AllArgsConstructor
public class WeatherResponseDto {

    private String city; // 사용자가 요청한 도시 이름
    private Double latitude; // 위도
    private Double longitude; // 경도
    private Double temperature; // 현재 기온
    private Double windSpeed; // 현재 풍속
    private Integer weatherCode; // 날씨 코드
    private Boolean cached; // Redis 캐시 데이터 여부
}
응답 DTO에는 cached 필드를 추가했다.
이를 통해 응답 데이터가 외부 API에서 새로 조회된 것인지, Redis 캐시에서 조회된 것인지 쉽게 확인 가능하다.
7. Open-Meteo 외부 API 응답 DTO 만들기
Open-Meteo는 도시 이름이 아닌 위도/경도를 통해 날씨를 조회하므로, 아래와 같이 외부 API 응답 DTO 2개가 필요하다.
도시 이름 입력 → Geocoding API로 위도/경도 조회 → Forecast API로 현재 날씨 조회
1. 도시 좌표 응답 DTO
@Getter
public class GeoCodingResponseDto {

    private List<Result> results;

    @Getter
    public static class Result {
        private String name;
        private Double latitude;
        private Double longitude;
        private String country;
    }
}
2. 현재 날씨 응답 DTO
@Getter
public class WeatherApiResponseDto {
    private Double latitude;
    private Double longitude;

    @JsonProperty("current_weather")
    private CurrentWeather currentWeather;

    @Getter
    public static class CurrentWeather {
        private Double temperature;

        @JsonProperty("windspeed")
        private Double windSpeed;

        @JsonProperty("weathercode")
        private Integer weatherCode;
    }
}
여기서 @JsonProperty를 사용하는데, 외부 API의 JSON 필드명과 Java 필드명과 다르기 때문에 매핑을 위해 사용한다.
8. WeatherService에서 외부 API 호출하기
Redis 캐싱 부분을 제외하고, 먼저 Open-Meteo API를 직접 호출해 데이터를 가져오는 부분을 구현한다.
@Service
@RequiredArgsConstructor
public class WeatherService {
private final RestClient restClient;
public WeatherResponseDto getCurrentWeather(String city) {
GeoCodingResponseDto geoResponse = restClient.get()
.uri("https://geocoding-api.open-meteo.com/v1/search?name={city}&count=1&language=ko&format=json", city)
.retrieve()
.body(GeoCodingResponseDto.class);
GeoCodingResponseDto.Result location = geoResponse.getResults().get(0);
WeatherApiResponseDto weatherResponse = restClient.get()
.uri("https://api.open-meteo.com/v1/forecast?latitude={latitude}&longitude={longitude}¤t_weather=true",
location.getLatitude(),
location.getLongitude())
.retrieve()
.body(WeatherApiResponseDto.class);
return new WeatherResponseDto(
city,
weatherResponse.getLatitude(),
weatherResponse.getLongitude(),
weatherResponse.getCurrentWeather().getTemperature(),
weatherResponse.getCurrentWeather().getWindSpeed(),
weatherResponse.getCurrentWeather().getWeatherCode(),
false
);
}
}
위 서비스의 흐름은 아래와 같다.
- city로 Geocoding API 호출
- 응답에서 위도/경도 추출
- 위도 경도로 Forecast API 호출
- 현재 날씨 정보 추출
- WeatherResponseDto로 변환
위 코드 그대로 실행해도 되지만, 외부 API 응답은 항상 정상적으로 온다고 보장할 수 없다.
네트워크 오류가 발생하거나, 잘못된 도시 이름을 입력하거나, 외부 API 응답 구조가 예상과 다르면 응답 객체가 null일 수 있다.
따라서, 도시 정보를 찾을 수 없는 경우와 날씨 정보를 가져올 수 없는 경우에 대해 임시적인 방어 코드를 추가했다.
package com.example.umcspringbootstudy.weather.service;
import com.example.umcspringbootstudy.weather.dto.GeoCodingResponseDto;
import com.example.umcspringbootstudy.weather.dto.WeatherApiResponseDto;
import com.example.umcspringbootstudy.weather.dto.WeatherResponseDto;
import lombok.RequiredArgsConstructor;
import org.springframework.stereotype.Service;
import org.springframework.web.client.RestClient;
@Service
@RequiredArgsConstructor
public class WeatherService {
private final RestClient restClient;
public WeatherResponseDto getCurrentWeather(String city) {
GeoCodingResponseDto geoResponse = restClient.get()
.uri("https://geocoding-api.open-meteo.com/v1/search?name={city}&count=1&language=ko&format=json", city)
.retrieve()
.body(GeoCodingResponseDto.class);
if (geoResponse == null || geoResponse.getResults() == null || geoResponse.getResults().isEmpty()) {
throw new IllegalArgumentException("도시 정보를 찾을 수 없습니다.");
}
GeoCodingResponseDto.Result location = geoResponse.getResults().get(0);
WeatherApiResponseDto weatherResponse = restClient.get()
.uri("https://api.open-meteo.com/v1/forecast?latitude={latitude}&longitude={longitude}¤t_weather=true",
location.getLatitude(),
location.getLongitude())
.retrieve()
.body(WeatherApiResponseDto.class);
if (weatherResponse == null || weatherResponse.getCurrentWeather() == null) {
throw new IllegalArgumentException("날씨 정보를 가져올 수 없습니다.");
}
return new WeatherResponseDto(
city,
weatherResponse.getLatitude(),
weatherResponse.getLongitude(),
weatherResponse.getCurrentWeather().getTemperature(),
weatherResponse.getCurrentWeather().getWindSpeed(),
weatherResponse.getCurrentWeather().getWeatherCode(),
false
);
}
}
9. WeatherController 설정하기
서비스를 실제 API 엔드포인트에 연결한다. 이때, 파라미터로 꼭 도시 명을 받아야 검색이 가능하다.
@RestController
@RequiredArgsConstructor
@RequestMapping("/weather")
public class WeatherController {

    private final WeatherService weatherService;

    @GetMapping
    public ApiResponse<WeatherResponseDto> getCurrentWeather(@RequestParam String city) {
        return ApiResponse.onSuccess(
                GeneralSuccessCode.OK, weatherService.getCurrentWeather(city)
        );
    }
}
추가적으로 실습 확인을 쉽게 하기 위해 인증 없이 접근 가능하도록 SecurityConfig의 허용 URL에 추가했다.

Redis 캐싱을 적용하기 전에 먼저 외부 API 호출이 정상적으로 동작하는지 확인했다.
이 단계에서는 Open-Meteo API를 직접 호출하므로 cached 값은 항상 false로 반환된다.
10. Redis 캐싱과 TTL 설정 적용하기
이제 기존 WeatherService에서 Redis를 붙여보겠다.
목표 흐름은 다음과 같다.
1. Redis에서 weather:{city} 조회
2. 캐시가 있으면 cached=true로 반환
3. 캐시가 없으면 외부 API 호출
4. 결과를 Redis에 저장
5. TTL 10분 설정
6. cached=false로 반환
데이터를 JSON 문자열로 저장하기 위해 StringRedisTemplate와 ObjectMapper를 사용할 예정이다.
*StringRedisTemplate Redis에 문자열 key, 문자열 value를 저장하고 조회할 때 쓰는 도구
*ObjectMapper Java 객체와 JSON 문자열을 서로 바꿔주는 도구
첫 번째 요청
- 외부 API 호출
- WeatherResponseDto 객체 생성
- ObjectMapper로 JSON 문자열 변환
- StringRedisTemplate으로 Redis에 저장
- 사용자에게 응답
두 번째 요청 (10분 이내)
- Redis에서 JSON 문자열 조회
- ObjectMapper로 WeatherResponseDto 객체 변환
- cached=true로 바꿔서 사용자에게 응답
수정한 서비스 코드는 다음과 같다.
TTL은 10분으로 설정했다. 10분이 지나면 Redis에서 자동으로 해당 캐시 데이터가 삭제된다.
@Service
@RequiredArgsConstructor
public class WeatherService {
private final RestClient restClient;
private final StringRedisTemplate stringRedisTemplate;
private final ObjectMapper objectMapper;
private static final Duration WEATHER_CACHE_TTL = Duration.ofMinutes(10);
public WeatherResponseDto getCurrentWeather(String city) {
String cacheKey = "weather:" + city;
String cachedWeather = stringRedisTemplate.opsForValue().get(cacheKey);
if (cachedWeather != null) {
try {
WeatherResponseDto response = objectMapper.readValue(cachedWeather, WeatherResponseDto.class);
return new WeatherResponseDto(
response.getCity(),
response.getLatitude(),
response.getLongitude(),
response.getTemperature(),
response.getWindSpeed(),
response.getWeatherCode(),
true
);
} catch (JsonProcessingException e) {
stringRedisTemplate.delete(cacheKey);
}
}
WeatherResponseDto response = getWeatherFromExternalApi(city);
try {
String json = objectMapper.writeValueAsString(response);
stringRedisTemplate.opsForValue().set(cacheKey, json, WEATHER_CACHE_TTL);
} catch (JsonProcessingException e) {
throw new IllegalStateException("날씨 정보를 캐시에 저장할 수 없습니다.", e);
}
return response;
}
private WeatherResponseDto getWeatherFromExternalApi(String city) {
GeoCodingResponseDto geoResponse = restClient.get()
.uri("https://geocoding-api.open-meteo.com/v1/search?name={city}&count=1&language=ko&format=json", city)
.retrieve()
.body(GeoCodingResponseDto.class);
if (geoResponse == null || geoResponse.getResults() == null || geoResponse.getResults().isEmpty()) {
throw new IllegalArgumentException("도시 정보를 찾을 수 없습니다.");
}
GeoCodingResponseDto.Result location = geoResponse.getResults().get(0);
WeatherApiResponseDto weatherResponse = restClient.get()
.uri("https://api.open-meteo.com/v1/forecast?latitude={latitude}&longitude={longitude}¤t_weather=true",
location.getLatitude(),
location.getLongitude())
.retrieve()
.body(WeatherApiResponseDto.class);
if (weatherResponse == null || weatherResponse.getCurrentWeather() == null) {
throw new IllegalStateException("날씨 정보를 가져올 수 없습니다.");
}
return new WeatherResponseDto(
city,
weatherResponse.getLatitude(),
weatherResponse.getLongitude(),
weatherResponse.getCurrentWeather().getTemperature(),
weatherResponse.getCurrentWeather().getWindSpeed(),
weatherResponse.getCurrentWeather().getWeatherCode(),
false
);
}
}
getCurrentWeather : 캐시 확인 + 최종 응답 처리
사용자의 요청이 들어왔을 때 가장 먼저 실행되는 메서드
외부 API를 바로 호출하지 않고, 먼저 Redis에 같은 도시의 날씨 데이터가 저장되어 있는지 확인한다.
캐시 키는 weather:{city} 형식으로 생성했다.
캐시 데이터가 존재하면 Redis에 저장된 JSON 문자열을 ObjectMapper를 사용해 WeatherResponseDto 객체로 변환한다.
이 경우 외부 API를 호출하지 않기 때문에 응답의 cached 값을 true로 설정한다.
캐시 데이터가 없으면 getWeatherFromExternalApi 메서드를 호출해 Open-Meteo API에서 날씨 정보를 새로 가져온다.
가져온 결과는 ObjectMapper로 JSON 문자열로 변환한 뒤 Redis에 저장한다.
이때 TTL을 함께 설정하여 일정 시간이 지나면 캐시 데이터가 자동으로 삭제되도록 했다.
즉, getCurrentWeather는 캐시 조회, 캐시 저장, TTL 설정, 최종 응답 반환을 담당한다.
getWeatherFromExternalApi : 외부 API 호출
실제로 Open-Meteo API를 호출하는 메서드
Open-Meteo의 날씨 API는 도시 이름만으로 현재 날씨를 조회할 수 없기 때문에,
Geocoding API를 호출해 도시의 위도와 경도를 구한다.
Geocoding API 응답에서 첫 번째 검색 결과를 꺼내 latitude와 longitude 값을 추출한다.
이후 추출한 위도와 경도를 사용해 Forecast API를 호출하고, 현재 기온, 풍속, 날씨 코드를 가져온다.
외부 API 응답은 그대로 클라이언트에게 반환하지 않고, 프로젝트에서 정의한 WeatherResponseDto로 변환해서 반환한다.
이 메서드에서 생성되는 응답은 Redis 캐시에서 가져온 데이터가 아니므로 cached 값은 false로 설정한다.
또한 외부 API 응답이 null이거나 도시 검색 결과가 없는 경우를 대비해 예외 처리를 추가했다.
캐싱 로직과 외부 API 호출 로직을 하나의 메서드에 모두 작성하면 코드가 길어지고 역할이 섞일 수 있다.
따라서, getCurrentWeather는 캐시 처리와 최종 응답을, getWeatherFromExternalApi는 외부 API 호출만 담당하도록 분리했다.
이렇게 나누면 각 메서드의 책임이 명확해지고, 이후 캐싱 정책이나 외부 API 호출 방식을 수정할 때도 관리하기 쉽다.
[전체 흐름]
GET /weather?city=인천
        ↓
getCurrentWeather("인천")
        ↓
Redis에서 weather:인천 조회
        ↓
캐시 있음 → JSON을 DTO로 변환 → cached=true 반환
        ↓
캐시 없음 → getWeatherFromExternalApi("인천")
        ↓
Geocoding API 호출 → 위도/경도 조회
        ↓
Forecast API 호출 → 현재 날씨 조회
        ↓
WeatherResponseDto 생성 cached=false
        ↓
Redis에 JSON 문자열로 저장 TTL 10분
        ↓
사용자에게 응답
제대로 적용되었는지 확인하기 위해 다시 인천의 날씨를 조회해보았다.
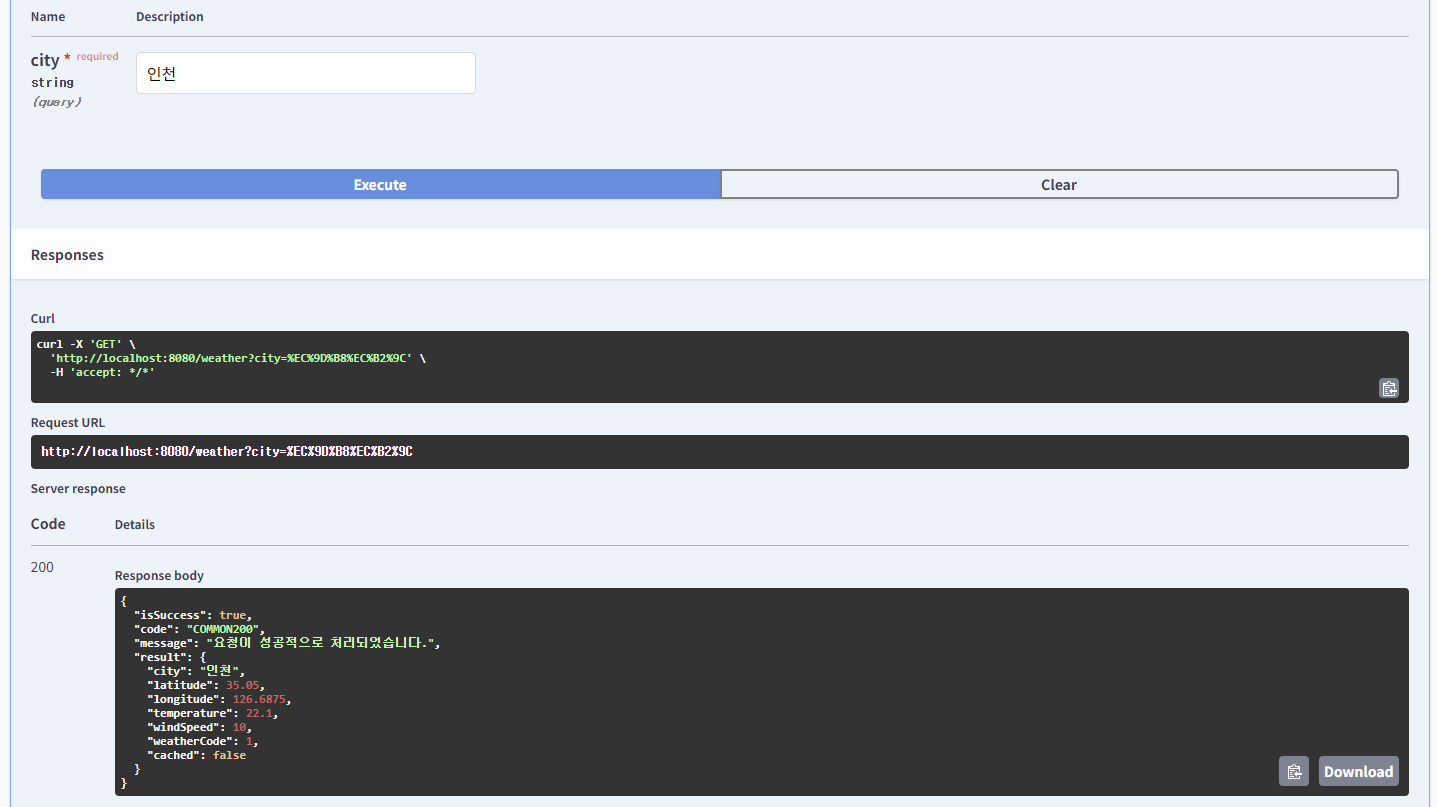
처음 조회 시, 응답 시간이 몇 초 간 걸리며 cached: false가 반환되었다.
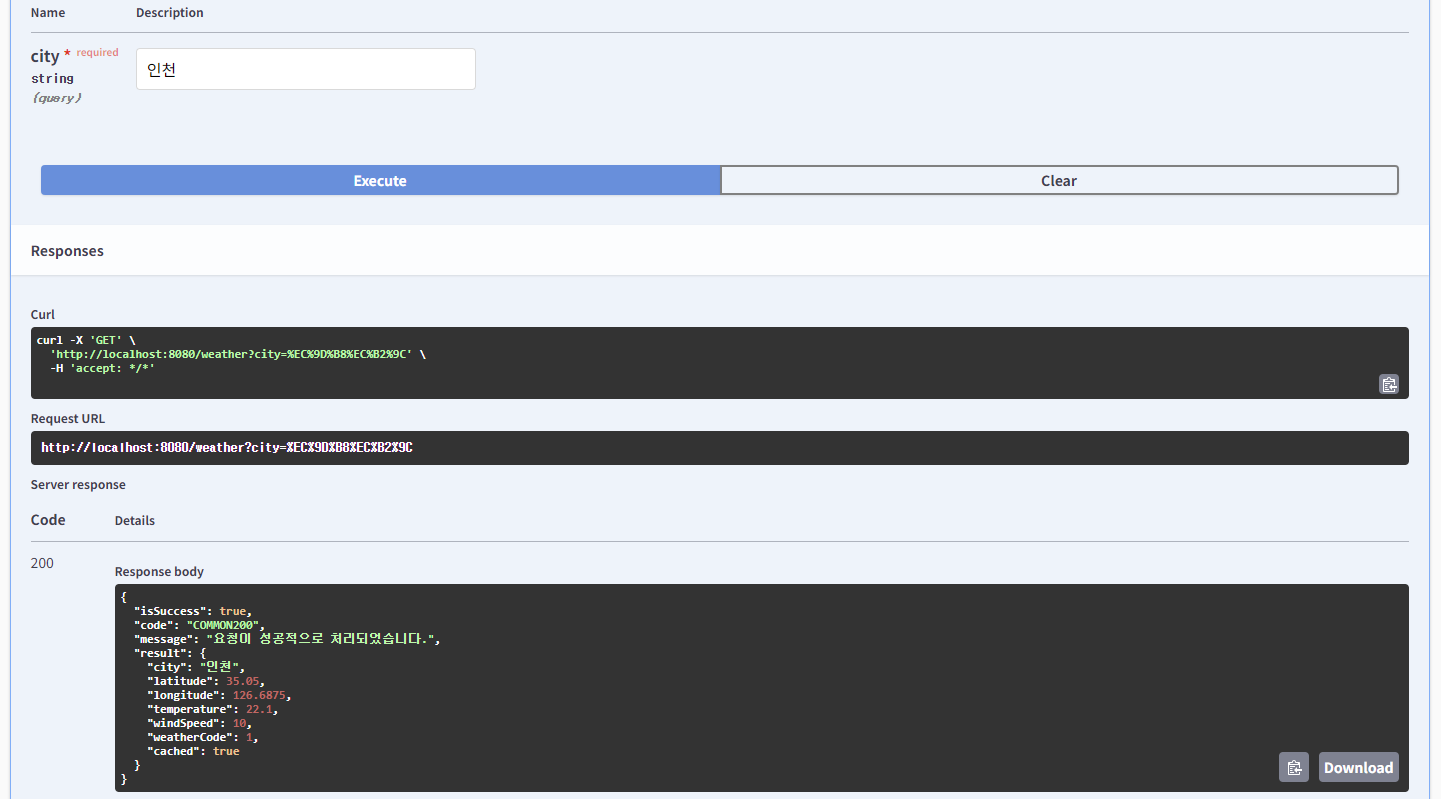
두 번째 조회 시, 캐시 데이터가 반환되므로 바로 답변이 반환되며 cached: true를 반환한 것을 볼 수 있다.
이처럼 Redis 캐싱을 적용하면 반복되는 외부 API 호출을 줄일 수 있고, 응답 속도 개선과 외부 API 호출 비용 절감 효과를 얻을 수 있다. 또한, TTL을 함께 사용하면 오래된 데이터가 계속 반환되는 문제를 방지할 수 있다!
'Springboot' 카테고리의 다른 글
| [Spring Boot] Docker와 Railway로 Spring Boot + MySQL 배포하기 (0) | 2026.06.12 |
|---|---|
| @Transactional과 DB 인덱스로 Spring Boot 애플리케이션 성능 최적화하기 (1) | 2026.05.15 |
| 게시글 목록 API 구현하기 (페이징 · 검색, N+1) (0) | 2026.05.07 |
| 회원가입 및 로그인 구현 (0) | 2026.04.28 |
| 게시판 CRUD (0) | 2026.03.30 |

