
co-cherry
회원가입 및 로그인 구현 본문
Spring Security
Spring 기반 애플리케이션에 인증(Authentication)과 인가(Authorization)기능을 제공하는 프레임워크
- 인증(Authentication) 사용자가 누구인지 확인하는 과정 (로그인 폼, OAuth2, JWT, LDAP 등 다양한 방식 지원)
- 인가(Authorization) 인증된 사용자가 어떤 리소스에 접근할 수 있는지 제어, URL 기반, 메서드 기반으로 권한 설정 가능
- 보안 공격 방어 CSRF, XSS, Session, Fixation 등 일반적인 보안 취약점을 기본으로 방어
FilterChain
HTTP 요청이 Controller에 도달하기 전 통과해야 하는 보안 필터들의 묶음
요청이 Controller에 도달하기 전에 인증/인가/예외 처리가 전부 완료된 상태로 넘어오게 한다.
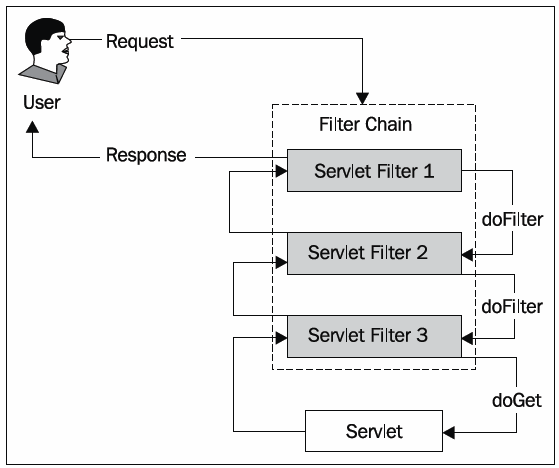

- SecurityContextPersistenceFilter
요청이 들어올 때 이전 인증 정보를 복원하고 요청이 끝날 때 다시 저장하는 필터
세션 기반에선 중요하나 JWT 방식에선 거의 사용하지 않음 - UsernamePasswordAuthenticationFilter
로그인 요청일 때만 동작
username / password를 꺼내서 인증을 시도하고 성공하면 SecurityContext에 저장 - AnonymousAuthenticationFilter
앞 필터들에서 인증이 안 됐을 때 ROLE_ANONYMOUS를 부여
Authentication이 null이 되는 것을 방지하기 위해 존재 - ExceptionTranslationFilter
아래 필터에서 던진 예외를 잡아 HTTP 응답으로 변환
AuthenticationException → 401
AccessDeniedException → 403 - FilterSecurityInterceptor
AccessDecisionManager에게 권한 판단을 넘기고 통과하면 Controller로, 실패하면 예외를 위로 던져 ExceptionTranslationFilter가 처리
인증(Authentication) 흐름

AuthenticationFilter (UsernamePasswordAuthenticationFilter)
HTTP 요청이 Controller에 도달하기 전에 가로채는 보안 필터
(Spring Security가 자동으로 등록하므로 직접 만들 필요 없음)
- 요청에서 username / password 추출
- 미인증 token을 생성해 AuthenticationManager에 넘김
- 인증 성공 후에는 SecurityContextHolder에 결과 저장
UsernamePasswordAuthenticationToken
사용자 인증 정보를 담는 객체 (Authentication 인터페이스의 구현체)
로그인 요청이 들어오면 UsernamePasswordAuthenticationFilter가 해당 요청을 받아 username과 password 이용해 토큰 생성
- 인증 전: username + password (authenticated = false)
- 인증 후: UserDetails + 권한 목록 (authenticated = true, password는 null 처리)
생성된 토큰은 AuthenticationManager에게 전달되어 인증 진행
AuthenticationManager
인증 처리를 총괄하는 인터페이스
직접 인증하지 않고 적절한 Provider에게 위임만 함
- Token을 받아 지원 가능한 AuthenticationProvider를 찾아 인증(Authentication)을 넘김
AuthenticationProvider
실제 인증 로직이 실행되는 곳
UserDetailsService로 유저를 조회하고, PasswordEncoder로 비밀번호를 검증
- DB에서 찾은 유저와 입력값을 비교해 일치하면 인증된 Token을, 불일치하면 BadCredentialsException을 던짐
PasswordEncoder
비밀번호를 암호화하고 검증하는 인터페이스
- 회원가입 시, 비밀번호를 암호화해 DB에 저장
- 로그인 시, 입력값과 DB 암호화값을 비교
UserDetailsService
DB에서 유저를 조회하는 인터페이스 (개발자가 직접 구현)
- username을 받아 DB에서 유저를 찾고 UserDetails 객체로 반환, 없으면 UsernameNotFoundException
UserDetails
Spring Security가 인식하는 유저 정보 객체, DB의 User 엔티티를 Security용으로 감싸는 래퍼 역할
- 비밀번호, 권한 목록, 계정 상태(잠김/만료 등)을 Security에 제공
- Provider가 이 객체를 기반으로 인증 Token 생성
SecurityContextHolder
인증된 유저 정보를 SecurityContext에 저장 및 관리하는 저장소
로그인이 완료되면 SecurityContext에 Authentication이 보관됨
- 인증 완료 후, 어디서든 현재 로그인한 유저 정보를 꺼낼 수 있게 해줌
- 스레드별로 독립적으로 관리되어 다른 사용자의 정보와 섞이지 않음
https://ittrue.tistory.com/287
[Spring Security] 스프링 시큐리티 인증 처리 흐름
스프링 시큐리티의 인증 처리 흐름 스프링 시큐리티에서는 스프링 시큐리티 필터 체인을 통해 보안을 위한 특정 작업을 처리한다. 다음은 사용자가 로그인 인증을 위한 요청을 할 경우, 스프링
ittrue.tistory.com
https://dev-coco.tistory.com/174
Spring Security의 구조(Architecture) 및 처리 과정 알아보기
시작하기 앞서 스프링 시큐리티에서 어플리케이션 보안을 구성하는 두 가지 영역에 대해 간단히 알아보자.인증(Authentication)과 인가(Authorization)대부분의 시스템에서는 회원을 관리하고 있고, 그
dev-coco.tistory.com
인가(Authorization) 흐름

FilterSecurityInterceptor
FilterChain의 가장 마지막에 위치하는 필터
실제 리소스(Controller)에 접근하기 직전에 권한 검사를 시작하는 인가의 진입점
- SecurityContextHolder에서 현재 유저의 Authentication을 꺼냄
- SecurityMetadataSource에서 해당 URL에 필요한 권한(ConfigAttribute)를 조회
- 이 두 정보를 AccessDecisionManager에게 넘겨 판단을 위임
SecurityMetadataSource
각 URL(리소스)에 접근하기 위해 필요한 권한 정보를 보관하는 저장소
- FilterSecurityInterceptor가 "이 URL에 필요한 권한이 뭐야?"라고 물으면 ConfigAttribute 목록으로 응답
- SecurityConfig에서 설정한 규칙이 여기에 저장
AccessDecisionManager
인가 판단을 총괄하는 인터페이스
직접 판단하지 않고 여러 AccessDecisionVoter에게 위임해 결과를 총합
- Authentication(사용자 권한)과 ConfigAttribute(필요 권한)을 받아 Voter들에게 투표 시킴
- 투표 결과를 취합해 최종 허용/거부 결정, 거부 시 AccessDeniedException 발생
AccessDecisionVoter
실제 권한 비교를 수행하는 투표자
사용자 권한과 필요 권한을 직접 비교해 허용/거부/기권 중 하나를 반환
ExceptionTranslationFilter
FilterSecurityInterceptor에서 발생한 Security 예외를 잡아 적절한 HTTP 응답으로 변환하는 필터
- 로그인이 안 된 상태의 접근은 AuthenticationEntryPoint로 넘겨 401 반환
- 권한 부족은 AccessDeniedHandler로 넘겨 403 반환
Security Config 설정
Spring Security가 제공하는 보안 기능들을 어떻게 적용할지 설정하는 클래스
- 이 URL은 누구나 접근 가능
- 이 URL은 로그인한 사람만 접근 가능
- 이 URL은 관리자만 접근 가능
이처럼 필터 체인과 보안 정책을 설정하는 곳이 바로 Security Config이다.
- @EnableWebSecurity Spring Security 설정 활성화
- @Configuration 이 클래스가 Spring 설정 클래스임을 선언, 내부 @Bean 메서드들이 Spring 컨테이너에 등록됨
- allowUris 배열 인증 없이 접근을 허용할 URL 목록들
- /** 은 하위 경로를 모두 포함하는 와일드카드
- 나중에 허용 URL을 추가할 때 이 배열만 수정하면 되므로 유지보수에 용이
package com.example.umcspringbootstudy.global.config;

import jakarta.servlet.http.HttpServletResponse;
import org.springframework.context.annotation.Bean;
import org.springframework.context.annotation.Configuration;
import org.springframework.security.config.annotation.web.builders.HttpSecurity;
import org.springframework.security.config.annotation.web.configuration.EnableWebSecurity;
import org.springframework.security.config.http.SessionCreationPolicy;
import org.springframework.security.crypto.bcrypt.BCryptPasswordEncoder;
import org.springframework.security.crypto.password.PasswordEncoder;
import org.springframework.security.web.SecurityFilterChain;

@EnableWebSecurity
@Configuration
public class SecurityConfig {

    private final String[] allowUris = {
            "/swagger-ui/**",
            "/v3/api-docs/**",
            "/users/signup",
            "/users/login",
    };

    @Bean
    public SecurityFilterChain securityFilterChain(HttpSecurity http) throws Exception {
        http
                .csrf(csrf -> csrf.disable())
                .sessionManagement(session ->
                        session.sessionCreationPolicy(SessionCreationPolicy.STATELESS)
                )
                .authorizeHttpRequests(requests -> requests
                        .requestMatchers(allowUris).permitAll()
                        .requestMatchers("/admin/**").hasRole("ADMIN")
                        .anyRequest().authenticated()
                )
                .exceptionHandling(exception -> exception
                        .authenticationEntryPoint((request, response, authException) ->
                                response.sendError(HttpServletResponse.SC_UNAUTHORIZED))
                        .accessDeniedHandler((request, response, accessDeniedException) ->
                                response.sendError(HttpServletResponse.SC_FORBIDDEN))
                );

        return http.build();
    }

    @Bean
    public PasswordEncoder passwordEncoder() {
        return new BCryptPasswordEncoder();
    }
}
securityFilterChain HTTP 요청에 대한 보안 규칙을 정의하는 핵심 빈
- csrf(csrf -> csrf.disable())
CSRF은 악성 사이트가 로그인된 사용자의 권한을 도용하는 공격(JWT 기반 REST API에선 불필요하므로 비활성화) - .sessionManagement(session -> session.sessionCreationPolicy(SessionCreationPolicy.STATELESS))
sessionManagement()는 서버의 세션 생성 방식 설정
SessionCreationPolicy.STATELESS 서버가 세션을 생성하지 않도록 함
*JWT 방식은 토큰 자체에 인증 정보가 담겨 있으므로 서버가 세션을 유지할 필요 없음 - .authorizeHttpRequests(requests -> requests
들어오는 HTTP 요청들에 대해 어떤 접근 권한이 필요한지 규칙 설정, 위에서부터 순서대로 매칭(순서 중요) - .requestMatchers(allowUris).permitAll()
requestMatchers()은 규칙을 적용할 URL 패턴 지정
permitAll()은 해당 URL에 인증 없이 누구나 접근 가능하도록 허용
→ allowUris 배열의 경로들은 누구나 접근 가능하도록 설정됨 - .requestMatchers("/admin/**").hasRole("ADMIN")
/admin/ 으로 시작하는 모든 경로는 ADMIN 역할을 가진 사용자만 접근 가능
hasRole()은 내부적으로 ROLE_ADMIN이라는 권한명을 찾음
*hasRole 메서드 사용 시, DB에 ROLE_ 접두사가 붙어 있어야 함 - .anyRequest().authenticated()
anyRequest()는 위에서 지정하지 않은 나머지 모든 요청을 의미
authenticated()는 해당 요청에 로그인(인증)을 요구 - .exceptionHandling(exception -> exception
인증/인가 과정에서 발생하는 예외 상황을 처리하는 설정- .authenticationEntryPoint((request, response, authException) ->
response.sendError(HttpServletResponse.SC_UNAUTHORIZED))
authenticationEntryPoint는 인증이 필요할 때, 인증 정보가 없으면 동작
쉽게 말해, 로그인 안 된 상태로 접근 시 401 Unauthorized 에러를 반환 - .accessDeniedHandler((request, response, accessDeniedException) ->
response.sendError(HttpServletResponse.SC_FORBIDDEN))
accessDeniedHandler는 인증은 됐지만 권한이 부족할 때 동작
쉽게 말해, 일반 유저가 /admin에 접근 시 403 Forbidden 에러를 반환
- .authenticationEntryPoint((request, response, authException) ->
- public PasswordEncoder passwordEncoder() { return new BCryptPasswordEncoder(); }
PasswordEncoder는 비밀번호를 암호화하는 인터페이스
BcryptPasswordEncoder는 BCrypt 해시 알고리즘을 사용하며 Spring Security에서 표준으로 사용
DB에 비밀번호 저장 시, 평문 대신 암호화된 값을 저장하기 위해 사용
최종적으로 위에서 설정한 모든 규칙을 적용해 SecurityFilterChain 객체를 생성하고 반환한다.
이 객체가 실제로 모든 요청을 가로채는 필터 체인으로 동작한다.
https://spring.io/projects/spring-security#overview
Spring Security
Spring Security is a powerful and highly customizable authentication and access-control framework. It is the de-facto standard for securing Spring-based applications. Spring Security is a framework that focuses on providing both authentication and authoriz
spring.io
ROLE
사용자 권한 등급을 나타내는 Enum
ROLE을 사용해 사용자 간 접근 제어 가능
- User 엔티티에 저장
- 회원가입 시, ROLE_USER(일반 회원)으로 고정
- SecurityConfig에서 접근 제어
- 반드시 ROLE_ 접두사 필수: hasRole("ADMIN") 사용 시, 내부적으로 ROLE_ADMIN을 찾는 것임
public enum Role {
    ROLE_ADMIN, ROLE_USER
}
회원가입 구현 (w. 비밀번호 암호화 저장)
먼저, 위 설정에서 회원가입 endpoint를 전체 접근 허용하고 passwordEncoder를 Bean으로 등록해야 한다.
DTO
회원가입 시 필요한 DTO를 먼저 설정했다.
User 도메인에 로그인과 회원가입 등 여러 DTO를 하나의 파일 안에 작성하기 위해 Record 타입으로 작성했다.
public class UserRequestDTO {

    public record SignUpDTO(
            @NotBlank
            String nickname,
            @NotBlank
            @Email
            String email,
            @NotBlank
            String password,
            Gender gender,
            String phoneNumber
    ) {}
}
public class UserResponseDTO {

    public record SignUpDTO(
            Long id,
            String nickname,
            String email
    ) {}
}*record java 14에서 추가된 불변 데이터 클래스
- 생성자, getter, equals, hashCode, toString 을 자동으로 만들어줌
Repository
회원가입 시, 이미 가입된 이메일은 재가입이 불가하므로 이메일 중복 체크하는 쿼리를 Repository에 구현한다.
public interface UserRepository extends JpaRepository<User, Long> {
    boolean existsByEmail(String email);
}
이때, Spring Data JPA는 Repository 인터페이스에 메서드 이름을 *특정 규칙으로 작성하면 쿼리를 자동으로 생성하는 것을 이용
동사 + By + 필드명 + (조건)- findBy → SELECT (조회)
- existsBy → SELECT EXISTS (존재 여부)
- countBy → SELECT COUNT (개수)
- deleteBy → DELETE (삭제)
Service
1. 앞에서 생성한 existsByEmail 쿼리를 이용해 중복 체크를 한다.
- DB에 이미 같은 이메일이 있으면 409 에러를 반환하고 종료한다.
2. 클라이언트가 보낸 평문 비밀번호를 BCrypt로 해시화한다. DB에는 해시화된 값이 저장된다.
- passwordEncoder.encode() 평문 비밀번호를 BCrypt 알고리즘으로 해시화
- 단방향 해시: 암호화는 가능하나 복호화는 불가능
- 솔트(Salt) 자동 추가: 같은 비밀번호도 매번 다른 해시값 반환
3. DTO에서 받은 값 + 암호화된 비밀번호 + Role로 User 엔티티를 만들고 DB에 저장한다.
@Service
@RequiredArgsConstructor
public class UserService {

    private final UserRepository userRepository;
    private final PasswordEncoder passwordEncoder;

    @Transactional
    public UserResponseDTO.SignUpDTO signup(UserRequestDTO.SignUpDTO dto) {

        if (userRepository.existsByEmail(dto.email())) {
            throw new GeneralException(UserErrorCode.USER_ALREADY_EXISTS);
        }

        String encodedPassword = passwordEncoder.encode(dto.password());

        User user = User.builder()
                .nickname(dto.nickname())
                .email(dto.email())
                .password(encodedPassword)
                .role(Role.ROLE_USER)
                .gender(dto.gender())
                .phoneNumber(dto.phoneNumber())
                .build();

        User savedUser = userRepository.save(user);

        return new UserResponseDTO.SignUpDTO(
                savedUser.getId(),
                savedUser.getNickname(),
                savedUser.getEmail()
        );
    }
}
Controller
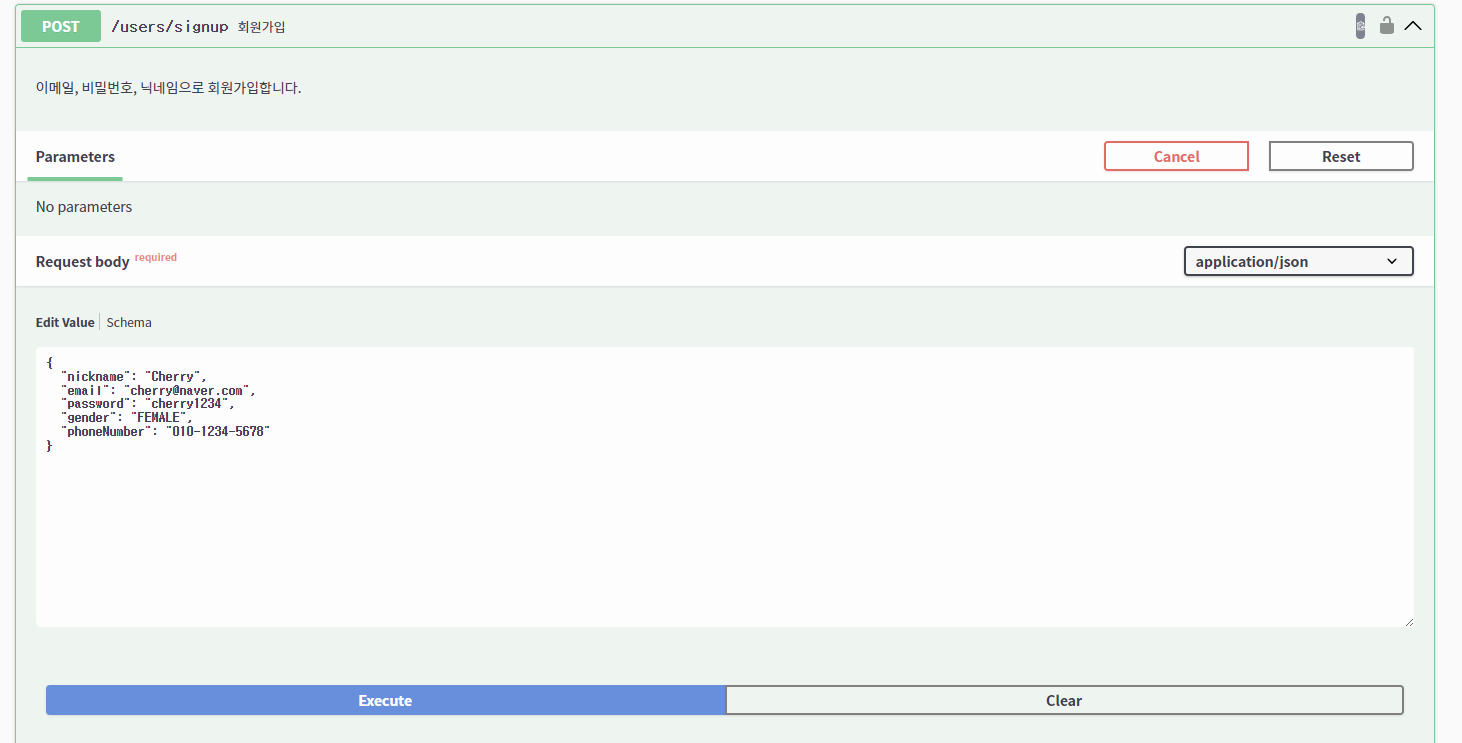
POST로 /users/signup 경로로 회원가입 요청을 받는다.
@Tag(name = "유저 API", description = "회원가입/로그인 관련 API")
@RestController
@RequiredArgsConstructor
@RequestMapping("/users")
public class UserController {

    private final UserService userService;

    @Operation(summary = "회원가입", description = "이메일, 비밀번호, 닉네임으로 회원가입합니다.")
    @PostMapping("/signup")
    public ApiResponse<UserResponseDTO.SignUpDTO> signup(@Valid @RequestBody UserRequestDTO.SignUpDTO dto) {
        return ApiResponse.onSuccess(GeneralSuccessCode.CREATED, userService.signup(dto));
    }
}
테스트
테스트로 tom의 정보를 입력해 회원가입을 수행했다.


DTO대로 id, nickname, email만이 반환된 것을 볼 수 있다.
intelliJ 내부에서 확인하면 비밀번호가 해시된 값으로 나오는 것을 확인할 수 있다.
또한, ROLE 또한 ROLE_USER로 제대로 나오는 모습을 볼 수 있다.

세션 기반 vs 토큰 기반 인증 비교
세션 기반(Stateful)
서버가 세션 저장소(메모리/Redis)에 사용자 정보를 직접 보관하고, 클라이언트는 세션 ID만 쿠키로 갖고 있는 상태
클라이언트                    서버
   |-- POST /login ----------->|
   |<-- Set-Cookie: JSESSIONID |  ← 세션 ID 발급, 서버 메모리에 저장
   |                           |
   |-- GET /api (Cookie) ----->|
   |                           |  ← 세션 ID로 서버에서 사용자 조회
   |<-- 200 OK ----------------|
토큰 기반(Stateless)
서버는 토큰을 저장하지 않고, 토큰의 서명(Signature)만 검증, 사용자 정보는 토큰 내부(Payload)에 담겨 있는 상태
클라이언트                    서버
   |-- POST /login ----------->|
   |<-- JWT Token -------------|  ← 토큰 발급, 서버는 저장 안 함
   |                           |
   |-- GET /api                |
   |   Authorization: Bearer <token>
   |                           |  ← 토큰 자체를 검증 (서명 확인)
|<-- 200 OK ----------------|| 구분 | 세션 기반 | 토큰 기반(JWT) |
| 서버 상태 | Stateful(세션 저장 필요) | Stateless(저장 불필요) |
| 확장성 | 서버 여러 대일 때 세션 공유 문제 | 어느 서버든 토큰만 검증하면 됨 |
| 보안 제어 | 서버에서 즉시 세션 무효화 가능 | 토큰 만료 전까지 강제 차단 어려움 |
| 로그아웃 | 서버에서 세션 삭제로 완전 로그아웃 | 클라이언트 토큰 삭제 필요 |
| 서버 부하 | 요청마다 세션 저장소 조회 | 저장소 조회 없이 서명만 검증 |
| 모바일/분리 구조 | 쿠키 기반이라 네이티브 앱에서 불편 | Header 방식이라 어느 클라이언트든 호환 |
| 구현 복잡도 | 상대적으로 단순 | Refresh Token 등 추가 고려 필요 |
우리 프로젝트는 Spring Boot REST API + 프론트 분리구조이므로 JWT 방식이 더 적합하므로 로그인 구현 시, JWT를 활용해보려고 한다.
JWT 발급과 로그인 구현
로그인 과정은 위에서 언급했던 인증(Authentication)의 흐름을 다시 살펴봐야 한다.

인증 과정에서 Spring Security는 "어떻게 유저를 찾을지" 모른다.
우리는 email 기반으로 users 테이블을 조회하고, Role enum으로 권한을 관리하기 때문에,
UserDetails와 UserDetailsService를 우리 도메인에 맞게 직접 작성해야 한다.
UserDetails
이메일, 비밀번호, 권한 등 유저 정보를 담는 객체
DB의 User 엔티티를 Spring Security가 이해할 수 있게 변환
Spring Security의 표준 인터페이스인 UserDetails를 CustomUserDetails로 구현했다.
@RequiredArgsConstructor
public class CustomUserDetails implements UserDetails {
    private final User user;

    public Long getUserId() {
        return user.getId();
    }

    @Override
    public Collection<? extends GrantedAuthority> getAuthorities() {
        return List.of(new SimpleGrantedAuthority(user.getRole().toString()));
    }

    @Override
    public String getPassword() {
        return user.getPassword();
    }

    @Override
    public String getUsername() {
        return user.getEmail();
    }
}- getAuthorities 권한을 List 형태로 반환 (ADMIN 또는 USER)
- getPassword 비밀번호 반환
- getUsername 아이디(또는 이메일) 반환
- getUserId 컨트롤러에서 @AuthenticationPrincipal CustomUserDetails로 꺼낼 때 userId를 바로 꺼내기 위해 별도 추가
UserDetailsService
DB에 쿼리해서 유저 정보를 찾아오는 서비스
loadUserByUsername(email) 메서드로 이메일 기반 조회 (Username == email)
- 로그인 요청(email + password)
- → loadUserByUsername(email) 메서드 spring이 자동 호출
- → DB에서 User 조회
- CustomUserDetails로 감싸서 반환
- Spring이 입력된 password와 DB password 비교
@Service
@RequiredArgsConstructor
public class CustomUserDetailsService implements UserDetailsService {
    private final UserRepository userRepository;

    @Override
    public UserDetails loadUserByUsername(String username) throws UsernameNotFoundException {
        User user = userRepository.findByEmail(username)
                .orElseThrow(() -> new UserException(UserErrorCode.USER_NOT_FOUND));
        return new CustomUserDetails(user);
    }
}
JWT 기반 인증 흐름
1. 로그인 시(토큰 발급)
- POST /users/login 요청을 보냄
- → UserService.login()
- → 비밀번호 검증
- → JwtUtil.generateToken() 을 통해 토큰 생성
- → 클라이언트에게 accessToken 반환
2. 로그인 후 API 요청 시(토큰 검증)
- GET /posts/1 요청을 보냄
Authorization: Bearer eyJhGC... - → JwtAuthFilter가 요청을 가로채 토큰 검증
- → SecurityContext에 인증 정보 저장
- → Controller 실행
JwtUtil 토큰 생성/검증/데이터 추출하는 도구
JWT 토큰은 그냥 문자열이 아닌 서명(Signature)이 포함된 구조체
이 토큰을 직접 만들고, 검증하고, 안에서 데이터를 꺼내는 작업이 복잡하기 때문에 JwtUtil 하나에 모아두는 것
- generateToken(userId) 토큰 생성
- validateToken(token) 토큰 유효성 검증
- getUserIdFromToken(token) 토큰에서 userId 추출
JwtAuthFilter 모든 요청을 감시하는 문지기
로그인 이후, GET 과 같은 요청이 오면 Spring Security는 이 사람이 누구인지 검증이 필요
그러나, JWT는 서버가 저장하지 않으므로 매 요청마다 토큰을 꺼내 검증하고, 인증 정보를 SecurityContext에 직접 넣어야 함
- Authorization: Bearer <token> 헤더에서 토큰 추출
- JwtUtil.validateToken() 으로 검증
- 유효하면 JwtUtil.getUserIdFromToken()으로 userId 추출
- DB에서 User를 조회해 CustomDetails 생성
- SecurityContextHolder에 인증 정보 저장
따라서, 토큰 기반 인증 구현 시, JwtUtil과 JwtAuthFilter 가 필요하다는 것을 생각하고 로그인 과정을 구현해보겠다.
먼저, build.gradle과 application.yml에 JWT 관련 설정을 넣어준다.
application.yml 에 넣는 시크릿 키는 환경 변수 처리를 하여 다음과 같이 설정했다.
    implementation 'io.jsonwebtoken:jjwt-api:0.12.3'
    implementation 'io.jsonwebtoken:jjwt-impl:0.12.3'
    implementation 'io.jsonwebtoken:jjwt-jackson:0.12.3'
    // implementation 'org.springframework.boot:spring-boot-configuration-processor'
jwt:
token:
secretKey: ${JWT_SECRET}
expiration:
access: 14400000
그리고 JwtUtil부터 작성해보자.
@Component
public class JwtUtil {

    private final SecretKey secretKey;
    private final Duration accessExpiration;

    // application.yml의 jwt 값을 생성자에서 주입받음
    public JwtUtil(
            @Value("${jwt.token.secretKey}") String secret,
            @Value("${jwt.token.expiration.access}") Long accessExpiration
    ) {
        // 문자열 시크릿 키 → HMAC-SHA 알고리즘용 SecretKey 객체로 변환
        this.secretKey = Keys.hmacShaKeyFor(secret.getBytes(StandardCharsets.UTF_8));
        // 밀리초 숫자 → Duration 타입으로 변환 (14400000ms = 4시간)
        this.accessExpiration = Duration.ofMillis(accessExpiration);
    }

    /**
     * Access Token 발급
     * 로그인 성공 시 UserService에서 호출
     */
    public String createAccessToken(CustomUserDetails user) {
        return createToken(user, accessExpiration);
    }

    /**
     * 토큰에서 이메일 추출
     * JwtAuthFilter에서 토큰 → 이메일 → DB 조회 순서로 사용
     */
    public String getEmail(String token) {
        try {
            return getClaims(token).getPayload().getSubject();
        } catch (JwtException e) {
            return null;
        }
    }

    /**
     * 토큰 유효성 검증
     * JwtAuthFilter에서 토큰 처리 전 가장 먼저 호출
     */
    public boolean isValid(String token) {
        try {
            getClaims(token);
            return true;
        } catch (JwtException e) {
            return false;
        }
    }

    // 토큰 생성 내부 로직
    private String createToken(CustomUserDetails user, Duration expiration) {
        Instant now = Instant.now();

        // 권한 목록 → 콤마 구분 문자열 변환 (예: "ROLE_USER")
        String authorities = user.getAuthorities().stream()
                .map(GrantedAuthority::getAuthority)
                .collect(Collectors.joining(","));

        return Jwts.builder()
                .subject(user.getUsername())                 // 이메일을 subject로 저장
                .claim("role", authorities)                  // 권한 정보 저장
                .issuedAt(Date.from(now))                    // 발급 시간
                .expiration(Date.from(now.plus(expiration))) // 만료 시간
                .signWith(secretKey)                         // 서명 (위변조 방지)
                .compact();                                  // 최종 토큰 문자열 반환
    }

    // 토큰 파싱 + 서명 검증
    // 서명이 잘못됐거나 만료되면 JwtException 발생
    // clockSkewSeconds(60): 서버 간 시간 오차 1분까지 허용
    private Jws<Claims> getClaims(String token) throws JwtException {
        return Jwts.parser()
                .verifyWith(secretKey)
                .clockSkewSeconds(60)
                .build()
                .parseSignedClaims(token);
    }
}
1. 생성자 - 시크릿 키와 만료 시간 준비
public JwtUtil(
        @Value("${jwt.token.secretKey}") String secret,
        @Value("${jwt.token.expiration.access}") Long accessExpiration
) {
    this.secretKey = Keys.hmacShaKeyFor(secret.getBytes(StandardCharsets.UTF_8));
    this.accessExpiration = Duration.ofMillis(accessExpiration);
}- Keys.hmacShaKeyFor() 문자열로 저장해둔 시크릿 키를 암호화 전용 객체(SecretKey)로 변환
2. createToken() - 토큰 조립
private String createToken(CustomUserDetails user, Duration expiration) {
    Instant now = Instant.now();

    String authorities = user.getAuthorities().stream()
            .map(GrantedAuthority::getAuthority)
            .collect(Collectors.joining(","));

    return Jwts.builder()
            .subject(user.getUsername())                 // "test@gmail.com"
            .claim("role", authorities)                  // "ROLE_USER"
            .issuedAt(Date.from(now))                    // 지금 시각
            .expiration(Date.from(now.plus(expiration))) // 지금 + 4시간
            .signWith(secretKey)                         // 서명
            .compact();                                  // 문자열로 변환
}- stream().map().collect() getAuthorities가 반환하는 [GrantedAuthority("ROLE_USER")]과 같은 리스트를 문자열로 변환
3. getClaims() - 토큰 파싱 + 서명 검증
private Jws<Claims> getClaims(String token) throws JwtException {
    return Jwts.parser()
            .verifyWith(secretKey)    // 이 키로 서명 검증
            .clockSkewSeconds(60)     // 시간 오차 1분 허용
            .build()
            .parseSignedClaims(token);
}- parseSignedClaims(token)
- 토큰을 Header / Payload / Signature 세 부분으로 분리
- secretKey로 Signature 검증 → 위변조 여부 확인
- exp(만료시간) 확인 → 만료됐으면 JwtException 발생
- 이상 없으면 Payload(Claims) 반환
4. getEmail() 과 isValid()
둘 다 getClaims()를 호출하지만 예외를 직접 던지지 않고, null / false로 변환해서 반환
public String getEmail(String token) {
    try {
        return getClaims(token).getPayload().getSubject(); // subject = 이메일
    } catch (JwtException e) {
        return null; // 잘못된 토큰이면 null 반환
    }
}

public boolean isValid(String token) {
    try {
        getClaims(token);
        return true;
    } catch (JwtException e) {
        return false; // 잘못된 토큰이면 false 반환
    }
}
로그인 시에는 createAccessToken() → createToken() → 토큰 문자열 반환의 과정을 거치고,
이후 요청 시에는 isValid() → getClaims() → 서명/만료 검증 → getEmail() → getClaims.getSubject() → 이메일 추출(후 DB에서 User 조회)의 과정을 거친다.
Q. 왜 토큰만으로 끝내지 않고 다시 DB를 조회할까?
유저가 탈퇴했으나 토큰이 유효하거나, 유저 권한이 변경되었는데 토큰에 적용이 되지 않은 경우, 계정이 정지되었으나 토큰이 유효한 경우 등이 발생할 수 있다.
이때, DB를 다시 조회하면 토큰 발급 시점이 아닌 항상 최신 상태의 유저 정보를 가져올 수 있다.
이 다음 JwtAuthFilter 를 작성해보자.
// OncePerRequestFilter: 하나의 요청에 딱 한 번만 실행되는 필터
@Component
@RequiredArgsConstructor
public class JwtAuthFilter extends OncePerRequestFilter {

    private final JwtUtil jwtUtil;
    private final CustomUserDetailsService customUserDetailsService;

    @Override
    protected void doFilterInternal(
            @NonNull HttpServletRequest request,
            @NonNull HttpServletResponse response,
            @NonNull FilterChain filterChain
    ) throws ServletException, IOException {

        // [1] Authorization 헤더에서 토큰 가져오기
        String token = request.getHeader("Authorization");

        // [2] 토큰이 없거나 "Bearer "로 시작하지 않으면 인증 없이 다음 필터로 넘김
        //     (로그인, 회원가입 등 인증이 필요 없는 요청은 여기서 통과)
        if (token == null || !token.startsWith("Bearer ")) {
            filterChain.doFilter(request, response);
            return;
        }

        // [3] "Bearer " 제거 후 순수 토큰 값만 추출
        //     "Bearer eyJhbGc..." → "eyJhbGc..."
        token = token.substring(7);

        // [4] 토큰 유효성 검증 (서명 확인 + 만료 여부)
        if (jwtUtil.isValid(token)) {
            // [5] 토큰에서 이메일 추출 후 DB 조회
            String email = jwtUtil.getEmail(token);
            UserDetails user = customUserDetailsService.loadUserByUsername(email);

            // [6] 인증 객체 생성
            //     파라미터: (principal, credentials, authorities)
            //     credentials(비밀번호)는 이미 인증된 상태이므로 null
            Authentication auth = new UsernamePasswordAuthenticationToken(
                    user,
                    null,
                    user.getAuthorities()
            );

            // [7] SecurityContext에 인증 정보 저장
            //     이후 컨트롤러에서 @AuthenticationPrincipal로 꺼낼 수 있음
            SecurityContextHolder.getContext().setAuthentication(auth);
        }

        // [8] 다음 필터로 넘김 (필수 — 없으면 요청이 여기서 멈춤)
        filterChain.doFilter(request, response);
    }
}
1. 요청에서 Authorization 헤더 꺼내기
String token = request.getHeader("Authorization");
2. 토큰이 없거나 Bearer가 아니면 그냥 통과
원래 요청을 request, 응답할 객체를 response에 넣음
로그인, 회원가입처럼 인증이 필요 없는 요청은 여기서 바로 다음으로 넘김
if (token == null || !token.startsWith("Bearer ")) {
    filterChain.doFilter(request, response);
    return;
}
3. "Bearer " 제거 후 순수 토큰만 추출
"Bearer eyJhbGc..." → "eyJhbGc..."
token = token.substring(7);
4. 토큰 유효성 검증
JWT 토큰의 정보를 읽고 서명이 올바른지, 만료되지 않았는지 확인 (JwtUtil 사용)
유효하지 않으면 블록 자체를 건너뜀
if (jwtUtil.isValid(token)) { ... }
5. 토큰에서 이메일 추출 → DB에서 유저 조회
JWT 토큰에서 사용자 정보를 추출 (JwtUtil 사용)
String email = jwtUtil.getEmail(token);
UserDetails user = customUserDetailsService.loadUserByUsername(email);
6. 인증 객체 생성
- UsernamePasswordAuthenticationToken(user: 인증된 유저 객체, null: 비밀번호, authorities: 권한 목록)
- 비밀번호가 null인 것은 토큰으로 이미 증명이 되었으므로 불필요
Authentication auth = new UsernamePasswordAuthenticationToken(
        user, null, user.getAuthorities()
);
7. SecurityContext에 저장
SecurityContextHolder.getContext().setAuthentication(auth);
8. 다음 필터로 넘김
filterChain.doFilter(request, response);
그 후, 로그인을 구현하기 위해 DTO와 Controller를 다음과 같이 작성했다.
public record LoginDTO(
            @NotBlank
            String email,
            @NotBlank
            String password
    ){}
@Builder
public record LoginDTO(
Long memberId,
String accessToken
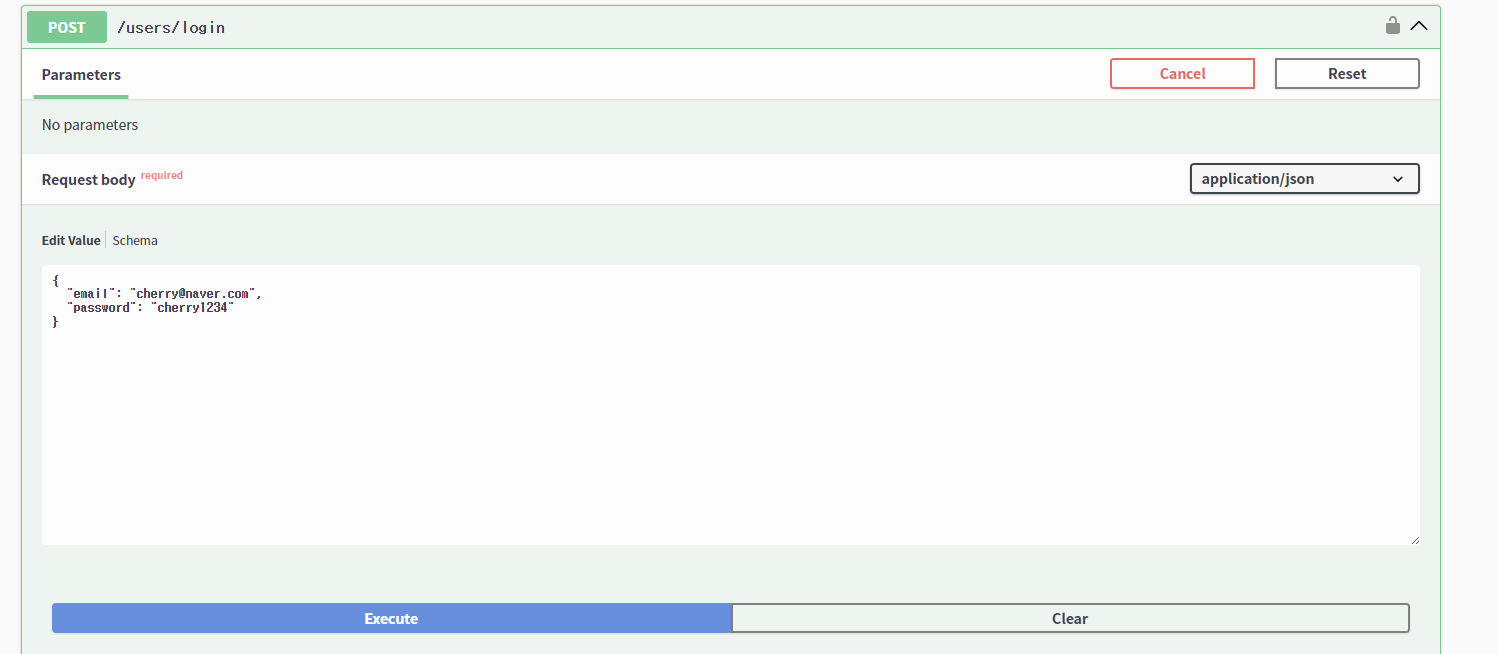
){}@PostMapping("/login")
public ApiResponse<UserResponseDTO.LoginDTO> login(@Valid @RequestBody UserRequestDTO.LoginDTO dto){
return ApiResponse.onSuccess(GeneralSuccessCode.OK, userService.login(dto));
}
서비스는 다음과 같은 과정을 거친다.
- 이메일로 유저 조회
- 입력된 비밀번호와 DB의 암호화된 비밀번호 비교
- User 엔티티를 CustomUserDetails로 감쌈
- accessToken 발급
public UserResponseDTO.LoginDTO login(UserRequestDTO.@Valid LoginDTO dto) {
        // [1] 이메일로 유저 조회 (없으면 예외)
        User user = userRepository.findByEmail(dto.email())
                .orElseThrow(() -> new GeneralException(UserErrorCode.USER_NOT_FOUND));

        // [2] 입력한 비밀번호와 DB의 암호화된 비밀번호 비교
        if (!passwordEncoder.matches(dto.password(), user.getPassword())) {
            throw new GeneralException(UserErrorCode.INVALID_PASSWORD);
        }

        // [3] CustomUserDetails로 감싸기
        CustomUserDetails userDetails = new CustomUserDetails(user);

        // [4] accessToken 발급
        String accessToken = jwtUtil.createAccessToken(userDetails);

        return UserResponseDTO.LoginDTO.builder()
                .memberId(user.getId())
                .accessToken(accessToken)
                .build();
}- passwordEncoder.matches() 비밀번호는 DB에 암호화되어 저장되어 있어 단순 비교가 불가능하므로 .matches()로 비교
마지막으로, 위에서 설정한 Security Config 설정을 일부 수정해야 한다.
1. 폼 로그인 화면 비활성화
Spring Security는 기본적으로 /login 경로에 폼 로그인 화면을 제공
JWT 방식에서는 오히려 충돌의 가능성이 있으므로 비활성화
.formLogin(AbstractHttpConfigurer::disable)
2. JwtAuthFilter를 Spring Security 필터 체인에 등록
기본 인증 필터가 실행되기 전에 JWT 검증을 먼저 처리해야 하므로 UsernamePasswordAuthenticationFilter 앞에 넣음
.addFilterBefore(jwtAuthFilter(), UsernamePasswordAuthenticationFilter.class)
3. jwtAuthFilter() Bean
JwtAuthFilter 객체를 Spring Bean으로 만들어 등록하는 메서드
jwtAuthFilter()를 호출하면 new JwtAuthFilter(jwtUtil, customUserDetailService)로 객체를 만들어서 반환
@Bean
public JwtAuthFilter jwtAuthFilter() {
    return new JwtAuthFilter(jwtUtil, customUserDetailsService);
}
정상적으로 처리되었는지 확인하기 위해 회원가입 후 로그인을 해보았다.


위 사진처럼 로그인 시, accessToken을 얻을 수 있는데, 이 토큰을 Swagger 우측 상단에 있는 authorize 버튼에 등록하면 된다.

테스트를 위해 이전에 작성한 Ping API를 실행해보았다.
인증 전
인증 전에는 401 인증이 필요하다는 에러가 발생한다.

인증 후
인증 후에는 요청이 정상적으로 처리되는 것을 볼 수 있다.

(추가) AuthenticationEntryPoint와 JWT 인증 예외 처리 통일
Spring security는 인증 실패 시, 아래와 같은 형식으로 응답한다.
하지만, 프로젝트의 나머지 API 에러 응답은 전부 아래처럼 통일된 형식을 사용하고 있다.
이를 일관성을 통일하기 위해 AuthenticationEntryPoint를 직접 구현해 응답을 통일해보았다.
*AuthenticationEntryPoint
인증되지 않은 요청이 보호된 리소스에 접근했을 때, Spring Security가 호출하는 핸들러
commence() 메서드 하나만 구현하면 되며, 이 안에서 응답을 직접 작성하는 형태
case 1: 토큰이 없을 때
- 클라이언트: Authorization 헤더 없이 요청
- JWTAuthFilter: 헤더가 null이므로 인증 처리 없이 다음 필터로 통과
- Spring Security: SecurityContext에 인증 정보가 없음을 감지 후, AuthenticationEntryPointImpl.commece() 호출
case 2: 토큰이 있지만 유효하지 않을 때(만료, 위조 등)
- 클라이언트: 만료되거나 위조된 토큰으로 요청
- JWTAuthFilter: 토큰 파싱 시도 → JwtException 발생
- JWTAuthFilter: JwtException을 BadCredentialsException으로 변환해 throw
- ExceptionTranslationFilter: AuthenticationException 감지해 AuthenticationEntryPointImpl.commece() 호출
두 케이스 모두 최종 응답은 AuthenticationEntryPointImpl 에서 처리되며,
토큰 없음/토큰이 유효하지 않음 모두 동일한 형식의 401 응답을 반환하게 된다.

Trouble Shooting
문제 상황
JWT 로그인을 구현한 뒤 Swagger에서 테스트하려고 했는데, 토큰을 입력할 수 있는 Authorize 버튼이 보이지 않음
예상 원인 1
Spring Boot는 기본적으로 MVC 관련 설정을 자동으로 해줌
@EnableWebMvc 를 붙이면 그 자동 설정이 비활성화되는데 Swagger 또한 그 자동 설정에 의존함
예상 원인 2
SecurityScheme은 Swagger에게 "이 API는 JWT Bearer 인증을 사용한다"고 알려 주는 설정
SecurityRequirement는 "모든 API에 그 인증을 적용한다"고 지시하는 설정
이 두 개가 다 없었음
결과
예상 원인을 모두 수정 후, 서버를 재시작하여 확인하니 정상적으로 Swagger 에서 Authorize 버튼이 활성화됨
로그인으로 발급받은 토큰 입력 시, 이후 모든 API 요청에 자동으로 Authorization: Bearer {token} 헤더가 붙게 됨
'Springboot' 카테고리의 다른 글
| @Transactional과 DB 인덱스로 Spring Boot 애플리케이션 성능 최적화하기 (1) | 2026.05.15 |
|---|---|
| 게시글 목록 API 구현하기 (페이징 · 검색, N+1) (0) | 2026.05.07 |
| 게시판 CRUD (0) | 2026.03.30 |
| ERD + DB + JPA 시작 (0) | 2026.03.24 |
| 예외 처리와 Validation (1) | 2026.03.13 |
